
Fresh from the oven...will you look at the crust on this baby?!
I think I have finally reconnected with the side of me that enjoys baking. You know I love to cook, but I've always struggled slightly with baking due to the need for exact measurements. However, I'm currently loving baking (and am significantly less intimidated) since obtaining this book, Food Gift Love. Earlier this week I baked something that is a super nostalgic item to bake - banana bread! It's comforting, reminds you of home, and you can't not love the moistness (is that even a word?) It's versatile, yet also simple and easy to whip up. Swoon, how the top forms a thin crust but underneath is soft and delicious...are you drooling yet?
The recipe from FGL is so easy to make, and didn't make a mess in my small kitchen (amen to that!). I love that the bread isn't too sweet, like some can be. It has that traditional taste but with a little something extra - which comes from the roasted bananas. Below you'll find the recipe from FGL, exactly how it appears in the book! I omitted the last ingredients (chocolate or pear), and I also added a nice helping of cinnamon. Since it was my first time baking this I didn't want to get too fancy, but next time I might even add a dash of ground ginger, some cinnamon, and maybe some pumpkin puree instead of the eggs...who knows!
The recipe from FGL is so easy to make, and didn't make a mess in my small kitchen (amen to that!). I love that the bread isn't too sweet, like some can be. It has that traditional taste but with a little something extra - which comes from the roasted bananas. Below you'll find the recipe from FGL, exactly how it appears in the book! I omitted the last ingredients (chocolate or pear), and I also added a nice helping of cinnamon. Since it was my first time baking this I didn't want to get too fancy, but next time I might even add a dash of ground ginger, some cinnamon, and maybe some pumpkin puree instead of the eggs...who knows!
Roasted Banana Bread
Makes: 1 large loaf or 3 mini-loaves // Preparation Time: 1 hour
Banana Bread makes a cameo at every bake sale, potluck, or holiday gathering; it’s the steadfast treat in the background, ready in case someone needs a little snack. Instead of waiting for bananas to ripen, I accelerate the process by roasting the fruit. And since my family fights over the warm slice with the most chocolate chunks, I put the chocolate on the inside and the outside. You should, too, only if consuming immediately. After a couple days, the chocolate on the outside turns a bit cloudy. If you anticipate that the bread may take your recipient a while to eat, mix all the chocolate into the batter before pouring it into the pan. A couple tips: While you roast the bananas, prepare everything else to save some time. Make sure to let the melted butter cool before adding it to the wet ingredients to prevent curdling. If chocolate isn’t your thing, add chopped nuts instead. I have also made banana bread studded with chopped ripe pear; it kept the loaf very moist and everyone loved it. If you opt for the pear version, spoon 1 tablespoon melted butter on top of the chopped pear so it browns nicely. Banana and pear and butter, oh my.
Ingredients:
- 4 large bananas
- 2 tablespoons and ½ cup unsalted butter, melted, cooled, and separated
- 2 cups all-purpose flour
- 1 teaspoon baking soda
- ½ teaspoon fine sea salt
- ½ cup granulated sugar
- 1 tablespoon vanilla extract
- 2 large eggs, beaten
- 6 ounces coarsely chopped milk, semisweet, or dark chocolate, or large chips or 8 ounces cubed ripe pear
Special Equipment:
9x5-inch loaf pan
1. Preheat the oven to 400°F. Place the unpeeled bananas, as is, on a parchment-lined baking sheet. Roast 15 minutes.
2. Meanwhile, with a pastry brush, butter the loaf pan with 2 tablespoons butter. (Or divide the butter among 3 mini-loaf pans.)
3. In a small bowl, sift together the flour, baking soda and sea salt. Set aside.
4. After you remove the bananas from the oven to cool, reduce the heat to 350°F. Let the bananas cool until just warm to the touch. Remove from and discard the skins, and place the roasted bananas in a large mixing bowl. Mash lightly with a fork.
5. To the bananas, add the sugar, brown sugar, vanilla extract, ½ cup melted butter, and the eggs, whisking together until combined and only a few small lumps remain. Add the dry ingredients to the wet mixture, and stir until just combined.
6. Fill the loaf pan just over halfway up the sides with the batter. Sprinkle the chocolate (or pear) onto the top of the raw banana mixture, pressing some of it gently into the mixture.
7. Bake 45 to 55 minutes or until a toothpick poked in the center comes out clean. Let the loaf cool in the pan 5 minutes, and then remove to a cooling rack to come to room temperature. Remove from the pan carefully, holding the sides and avoiding the top, so you don’t smear the warm chocolate.
8. Store wrapped in plastic wrap at room temperature up to 1 week.
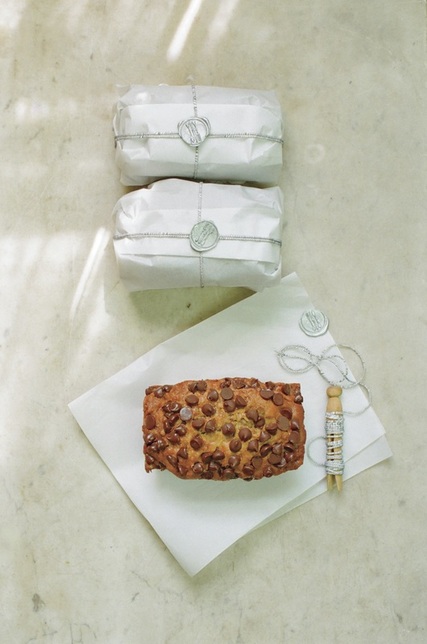
Gift Wrap
Parchment paper
Tape
String
Wax and wax sealer (optional)
Once cool, wrap each bread in parchment paper as you would a gift, folding and tucking the ends of each side down under the bread. Adhere the ends with a quick piece of tape. Wrap string around bread, as you would a gift, and tie into a knot. Trim the ends short. Remove the tape. Light a wax stick (if using) to drip over the meeting spot of the string and press the sealer (if using) into the hot wax to form an imprint. Alternatively, make a seal on a separate piece of paper and adhere it to the bread with a touch of glue.
Text excerpted from FOOD, GIFT, LOVE, © 2015 by MAGGIE BATTISTA. Reproduced by permission of Houghton Mifflin Harcourt. All rights reserved.
Author/Recipe photo © HEIDI MURPHY.
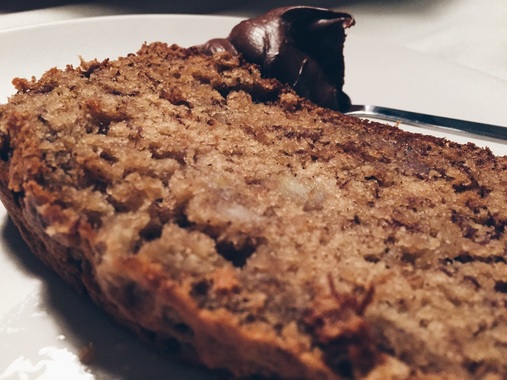
Served with a side of Nutella...mm!
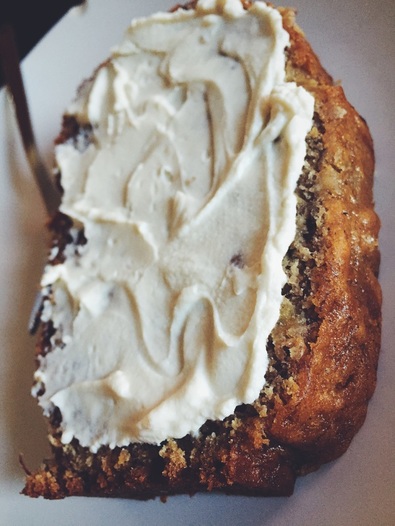
Slathered with vegan cream cheese from Kite Hill...so good!
I hope this inspires you to get in the kitchen and bake something delicious! Check out Maggie's lovely book which you can find locally at Farm and Fable, and also today Maggie will be doing a book signing at Lekker Home from 2-4pm! I'll be there for sure!
xx
S
xx
S

 RSS Feed

